Getting Started Guides
Gravio Rental Devices Setup
Zigbee Devices and Sensors
Temperature Sensor
Monitor and measure temperature in real-time.
Learn how to set up
arrow-down
Door and Window Sensor
Detect if a door or window is open or close in real-time.
Learn how to set up
arrow-down
Motion Sensor
Detect movement at a distance.
Learn how to set up
arrow-down
Wireless Mini Button
Control or trigger connected devices or programs wirelessly.
Learn how to set up
arrow-down
Vibration Sensor
Detect movement and vibration of objects.
Learn how to set up
arrow-down
Wireless Double Button
Control or trigger connected devices or programs wirelessly.
Learn how to set up
arrow-down
Gravio CO2
Detect CO2 concentration.
Learn how to set up
arrow-down
Gravio Light
Change the color of this wireless LED light using Gravio to indicate events or statuses.
Learn how to set up
arrow-down
Gravio LED Matrix
16x16 colorful display with Zigbee remote access.
Learn how to set up
arrow-down
Gravio Multi Sensor
Multi-functional sensor device equipped with an IMU sensor and a human radar sensor.
Learn how to set up
arrow-down
Temperature Sensor

Product introduction

The Aqara temperature and humidity sensor sends indoor temperature, humidity, atmospheric pressure in real time to Gravio.

Note: This product is for indoor use only.

Quick Setup

  1. Insert the Gravio receiver in the USB port of your PC or Mac, then start the Gravio Edge Server.
  2. Remove the sensor's battery insulation seal.
  3. Start Gravio Studio on your PC, iPhone or iPad, tap to select Gravio Server which you just started, and create areas to describe where the Sensors are and layers to group them by function. Please select "Aqara-Temperature" from the layer selection list.
  4. Connect the Graivo receiver to this layer.
  5. From the Gravio Studio device list, tap the gravio Receiver line.
  6. If this sensor is the first to be connected sensor, press "Reset". (Please do not reset your receiver before adding subsequent sensors.)
  7. Next, press the "Pairing" button.
  8. When pairing is in progress, you will see a count-down. During that count-down, press the button on the sensor once.
  9. When the sensor connected to Gravio Studio screen is displayed, connection is completed.

Note: If the connection fails, please move the accessory closer to the Gravio Receiver and try again.

Installation

Option 1: Place it directly in the desired position.

Option 2 : Remove the protective film, and stick it to the desired position.

Note: Keep the surface clean and dry.

Specifications

  1. Model: WSDCGQ11LM
  2. Dimensions: 36 × 36 × 9 mm (1.42 × 1.42 × 0.35 in. )
  3. Wireless Protocol: Zigbee
  4. Battery: CR2032
  5. Temperature Range and Precision: -20°~ +50° C, ± 0.3° C
  6. Humidity Range and Precision: 0~100% RH, ± 3%
  7. Atmospheric Pressure Range and Precision: 30 kPa ~ 110 kPa, ± 0.12 kPa
  8. Operating Humidity: 0~95% RH, no condensation
Door and Windows Sensor

Product Introduction

The Aqara door/window opening and closing sensor examines the opening and closing state of a door or a window. If the the sensor unit comes close to the magnet, the repective state is sent to the Gravio Edge Server where appropriate Gravio Actions can be triggered in response.

Note: This product is for indoor use only.

Quick Setup

  1. Insert the Gravio receiver in the USB port of your PC or Mac, then start the Gravio Edge Server.
  2. Remove the sensor's battery insulation seal.
  3. Start Gravio Studio on your PC, iPhone or iPad, tap to select Gravio Server which you just started, and create areas to describe where the Sensors are and layers to group them by function. Please select "Aqara-Door" from the layer selection list.
  4. Connect the Graivo receiver to this layer.
  5. From the Gravio Studio device list, tap the Gravio Receiver line.
  6. If this sensor is the first to be connected sensor, press "Reset". (Please do not reset your receiver before adding subsequent sensors.)
  7. Next, press the "Pairing" button in Gravio Studio.
  8. When pairing is in progress, you will see a count-down. During that count-down, press the button on the sensor once.
  9. When the sensor connected to Gravio Studio screen is displayed, connection is completed.

Note: If the connection fails, please move the accessory closer to the Gravio Receiver and try again.

Installation

Step 1: Remove the protective film.

Step 2: Align the marker line on the sensor unit and the magnet.

Step 3: Stick magnet and sensor device to doors or windows (It is recommended to install the sensor unit on the immovable surface, and the magnet on the moveable surface. Make sure the installation gap is less then 22mm when doorsor windows are closed.)

Specifications

  1. Model: MCCGQ11LM
  2. Dimensions: 41 × 22 × 11 mm (1.61 × 0.87 × 0.43 in. )
  3. Wireless Protocol: Zigbee
  4. Battery: CR1632
  5. Maximum Detection Distance: 22mm
  6. Operating Temperature: -10° ~+50° C
  7. Operating Humidity: 0~95% RH, no condensation
Motion Sensor

Product introduction

Aqara motion sensor detects human motion using infrared rays. By linking with Gravio, you can use it in various scenarios, such as turning the light on/off automatically when activity or human presence is detected.

Note: This product is for indoor use only.

Quick Setup

  1. Insert the Gravio receiver in the USB port of your PC or Mac, then start the Gravio Edge Server.
  2. Remove the sensor's battery insulation seal.
  3. Start Gravio Studio on your PC, iPhone or iPad, tap to select Gravio Server which you just started, and create areas to describe where the Sensors are and layers to group them by function. Please select "Aqara-Occupancy" from the layer selection list.
  4. Connect the Graivo receiver to this layer.
  5. From the Gravio Studio device list, tap the Gravio Receiver line.
  6. If this sensor is the first to be connected sensor, press "Reset". (Please do not reset your receiver before adding subsequent sensors.)
  7. Next, press the "Pairing" button in Gravio Studio.
  8. When pairing is in progress, you will see a count-down. During that count-down, press the button on the sensor once.
  9. When the sensor connected to Gravio Studio screen is displayed, connection is completed.

Note: If the connection fails, please move the accessory closer to the Gravio Receiver and try again.

Installation

Option 1: Place it directly in the desired position.

Option 2 : Remove the protective film, and stick it to the desired position.

Option 3 : Stick the Motion Sensor to the stand, and stick the stand to where you need it.

Notes: Keep the surface clean and dry.

The recommended installation height is 1.2 to 2.1 meter. If the installation height is below 1.2 meter, the detection area will be decreased; if above 2.1meter, the detection area might have blind spots.

Note that the lens should be aligned with the detection area when installing, and place or pasted as close as possible to the edge of a table or cabinet.

Specifications

  1. Model: RTCGQ11LM
  2. Dimensions: 30× 30 × 33 mm (1.18 × 1.18 × 1.30 in. )
  3. Wireless Protocol: Zigbee
  4. Battery: CR2450
  5. Maximum Detection Distance: 7meter
  6. MaximumDetection Angle: 170°
  7. Operating Temperature: -10°~ +45° C
  8. Operating Humidity: 0~95%RH, no condensation
Wireless Mini Button

Product introduction

The Aqara wireless button is a compact design and low power consumption remote control button. You can assign Gravio action to each operation such as press once, press twice, or press and hold.

Note: This product is for indoor use only.

Quick Setup

  1. Insert the Gravio receiver in the USB port of your PC or Mac, then start the Gravio Edge Server.
  2. Remove the sensor's battery insulation seal.
  3. Start Gravio Studio on your PC, iPhone or iPad, tap to select Gravio Server which you just started, and create areas to describe where the Sensors are and layers to group them by function. Please select "Aqara-WirelessSwitch" from the layer selection list.
  4. Connect the Graivo receiver to this layer.
  5. From the Gravio Studio device list, tap the gravio Receiver line.
  6. If this sensor is the first to be connected sensor, press "Reset". (Please do not reset your receiver before adding subsequent sensors.)
  7. Next, press the "Pairing" button.
  8. When pairing is in progress, you will see a count-down. During that count-down, press the button on the sensor once.
  9. When the sensor connected to Gravio Studio screen is displayed, connection is completed.

Note: If the connection fails, please move the accessory closer to the Gravio Receiver and try again.

Installation

Option 1: Place it directly in the desired position.

Option 2 : Remove the protective film, and stick the wireless button to the desired position.

* Keep the surface clean and dry.

Specifications

  1. Model: WXKG11LM
  2. Dimensions: 45 × 45 × 12 mm (1.77 × 1.77 × 0.47 in. )
  3. Wireless Protocol: Zigbee
  4. Battery: CR2032
  5. Operating Temperature: -10° ~ +50° C
  6. Operating Humidity: 0~95% RH, no condensation
Vibration Sensor

Product introduction

The Aqara Vibration Sensor is embedded with a high precision acceleration sensor and it detects the vibration and movement of objects. It also works with other smart accessories to set various smart scenes, such as, local and remote alarm when it detects glass breaks.

It can detect falls, vibrations, inclinations and a stable position (~1 minute after no motion has been detected).

Note: This product is for indoor use only.

Quick Setup

  1. Insert the Gravio receiver in the USB port of your PC or Mac, then start the Gravio Edge Server.
  2. Remove the sensor's battery insulation seal.
  3. Start Gravio Studio on your PC, iPhone or iPad, tap to select Gravio Server which you just started, and create areas to describe where the Sensors are and layers to group them by function. Please select "Aqara-Vibration-Falling",  "Aqara-Vibration-Inclination" or  "Aqara-Vibration-Stable" from the layer selection list.
  4. Connect the Graivo receiver to this layer.
  5. From the Gravio Studio device list, tap the gravio Receiver line.
  6. If this sensor is the first to be connected sensor, press "Reset". (Please do not reset your receiver before adding subsequent sensors.)
  7. Next, press the "Pairing" button.
  8. When pairing is in progress, you will see a count-down. During that count-down, press the button on the sensor once.
  9. When the sensor connected to Gravio Studio screen is displayed, connection is completed.

Note: If the connection fails, please move the accessory closer to the Gravio Receiver and try again.

Installation

Option 1: Place it directly in the desired position.

Option 2 : Remove the protective film, and stick the wireless button to the desired position.

* Keep the surface clean and dry.

Specifications

  1. Model: DJT11LM
  2. Dimensions: 36 × 36 × 9 mm (1.42 × 1.42 × 0.35 in. )
  3. Wireless Protocol: Zigbee
  4. Battery: CR2032
  5. Operating Temperature: -10° ~ +50° C
  6. Operating Humidity: 0~95% RH, no condensation
Wireless Double Switch

Product introduction

Wireless Remote Switch (Double Rocker) is a remote control switch with low energy consumption and standard 86 type industrial design. Simply place or stick it almost anywhere to use. You can control Smart Wall Switch, Smart Plug and other smart accessories with single press, double press or long press of the Wireless Remote Switch.

Note: This product is for indoor use only.

Quick Setup

  1. Insert the Gravio receiver in the USB port of your PC or Mac, then start the Gravio Edge Server.
  2. Remove the sensor's battery insulation seal.
  3. Start Gravio Studio on your PC, iPhone or iPad, tap to select Gravio Server which you just started, and create areas to describe where the Sensors are and layers to group them by function. Please select "Aqara-WirelessSwitch" from the layer selection list.
  4. Connect the Graivo receiver to this layer.
  5. From the Gravio Studio device list, tap the gravio Receiver line.
  6. If this sensor is the first to be connected sensor, press "Reset". (Please do not reset your receiver before adding subsequent sensors.)
  7. Next, press the "Pairing" button.
  8. When pairing is in progress, you will see a count-down. During that count-down, press the button on the sensor once.
  9. When the sensor connected to Gravio Studio screen is displayed, connection is completed.

Note: If the connection fails, please move the accessory closer to the Gravio Receiver and try again.

Installation

Option 1: Place it directly in the desired position.

Option 2 : Remove the protective film, and stick the wireless button to the desired position.

* Keep the surface clean and dry.

Specifications

  1. Model: WXKG02LM
  2. Dimensions: 86 × 86 × 15.12 mm (3.39 × 3.39 × 0.60 in.)
  3. Wireless Protocol: Zigbee
  4. Battery: CR2032
  5. Operating Temperature: -5° ~ +50° C
  6. Operating Humidity: 5~95% RH, no condensation
Gravio CO2

Product introduction

Gravio CO2 is an USB-C powered CO2 sensor that can report indoor CO2 measurements through a Zigbee connection.

Note: This product is for indoor use only.

Quick Setup

  1. Slide open the magnetic back panel and connect Gravio CO2 to power via USB-C.
  2. Insert the Gravio receiver in the USB port of your PC or Mac, then start the Gravio Edge Server.
  3. Start Gravio Studio on your PC, iPhone or iPad, tap to select Gravio Server which you just started.
  4. Click on the Devices icon in the top right.
  5. Select your Zigbee dongle (ensure that it has Firmware 0.9.3.0 or higher).
  6. Put the dongle in pairing mode.
  7. When pairing is in progress, you will see a count-down. During that count-down, hold the Gravio CO2 close to the USB dongle and long-press the button on the Sensor for 5 seconds.
  8. When the Gravio CO2 is connected, it will appear on the list of Zigbee devices.
  9. The Sensor is now ready to be used in the Gravio Actions.

Notes:

• If the connection fails, please move the accessory closer to the Gravio Receiver and try again.

• A short press triggers a network check. "Green" indicates the device has joined the network. "Red" means it's not connected to a network.

• Press the pairing button for 5 seconds for the device to enter pairing mode and hold it right next to the receiver device.

Installation

Remove the magnetic back panel and connect the USB-C cable for power.

Option 1: Place your Gravio CO2 directly in the desired position.

Option 2 : Remove the protective film, and stick the Gravio CO2 back panel to the desired position, so the Gravio CO2 can slide onto it.

* Keep the surface clean and dry.

Specifications

  1. Model: Gravio CO2
  2. Dimensions: 60 x 60 x 27 mm (2.4 x 2.4 x 1.1 in. )
  3. Wireless Protocol: Zigbee
  4. Power: USB-C (5V_1A)
  5. Operating Temperature: 0° ~ +50° C
  6. Operating Humidity: 0~85% RH, no condensation
  7. Measurement Range: 400 to 2,000 (ppm)
  8. Guaranteed Measurement Range:
    25 (°C) 101.3 (kPa) 400-2,000 (ppm) ±40 (ppm) ) ± 3 (%)
  9. Resolution: 1 (ppm)
Gravio Light

Product introduction

Gravio Light is an USB-C powered LED light that can change its colours through a Zigbee connection.

Note: This product is for indoor use only.

Quick Setup

  1. Slide open the magnetic back panel and connect Gravio Light to power via USB-C.
  2. Insert the Gravio receiver in the USB port of your PC or Mac, then start the Gravio Edge Server.
  3. Start Gravio Studio on your PC, iPhone or iPad, tap to select Gravio Server which you just started.
  4. Click on the Devices icon in the top right.
  5. Select your Zigbee dongle (ensure that it has Firmware 0802 or higher).
  6. Put the dongle in pairing mode.
  7. When pairing is in progress, you will see a count-down. During that count-down, hold the Gravio Light close to the USB dongle and long-press the button on the light for 5 seconds.
  8. When the light is now connected, it will appear on the list of Zigbee devices.
  9. The light is now ready to be used in the Gravio Actions.

Note: If the connection fails, please move the accessory closer to the Gravio Receiver and try again.

Installation

Remove the magnetic back panel and connect the USB-C cable for power.

Option 1: Place your Gravio Light directly in the desired position.

Option 2 : Remove the protective film, and stick the Gravio Light back panel to the desired position, so the Gravio Light can slide onto it.

* Keep the surface clean and dry.

Specifications

  1. Model: Gravio Light
  2. Dimensions: 60 x 60 x 27 mm (2.4 x 2.4 x 1.1 in. )
  3. Wireless Protocol: Zigbee
  4. Power: USB-C (5V_1A)
  5. Operating Temperature: -10° ~ +50° C
  6. Operating Humidity: 0~95% RH, no condensation
Gravio LED Matrix

Product introduction

Gravio LED Matrix is an USB-C powered 16x16 LED display through Zigbee connection.

Note: This product is for indoor use only.

Quick Setup

  1. Slide open the magnetic back panel and connect Gravio LED Matrix to power via USB-C.
  2. Insert the Gravio receiver in the USB port of your PC or Mac, then start the Gravio HubKit.
  3. Start Gravio Studio on your PC, tap to select Gravio HubKit which you just started.
  4. Click on the Devices icon in the top right.
  5. Select your Zigbee dongle (Please use latest Firmware).
  6. Put the dongle in pairing mode.
  7. When pairing is in progress, you will see a count-down. During that count-down, hold the Gravio LED Matrix close to the USB dongle and long-press the button on the light for 5 seconds.
  8. When the LED Matrix is now connected, it will appear on the list of Zigbee devices.
  9. The LED Matrix is now ready to be used in the Gravio HubKit.

Note: If the connection fails, please move the accessory closer to the Gravio Receiver and try again.

Installation

Remove the magnetic back panel and connect the USB-C cable for power.

Option 1: Place your Gravio LED Matrix directly in the desired position.

Option 2 : Remove the protective film, and stick the Gravio LED Matrix back panel to the desired position, so the Gravio Light can slide onto it.

* Keep the surface clean and dry.

Specifications

  1. Model: Gravio LED Matrix
  2. Dimensions: 100 x 100 x 24.5 mm
  3. Weight: 160g
  4. Wireless Protocol: Zigbee
  5. Power: USB-C (5V_1A)
  6. Operating Temperature: -10° ~ +65° C
  7. Operating Humidity: 0~95% RH, no condensation
Gravio Multi Sensor

Product introduction

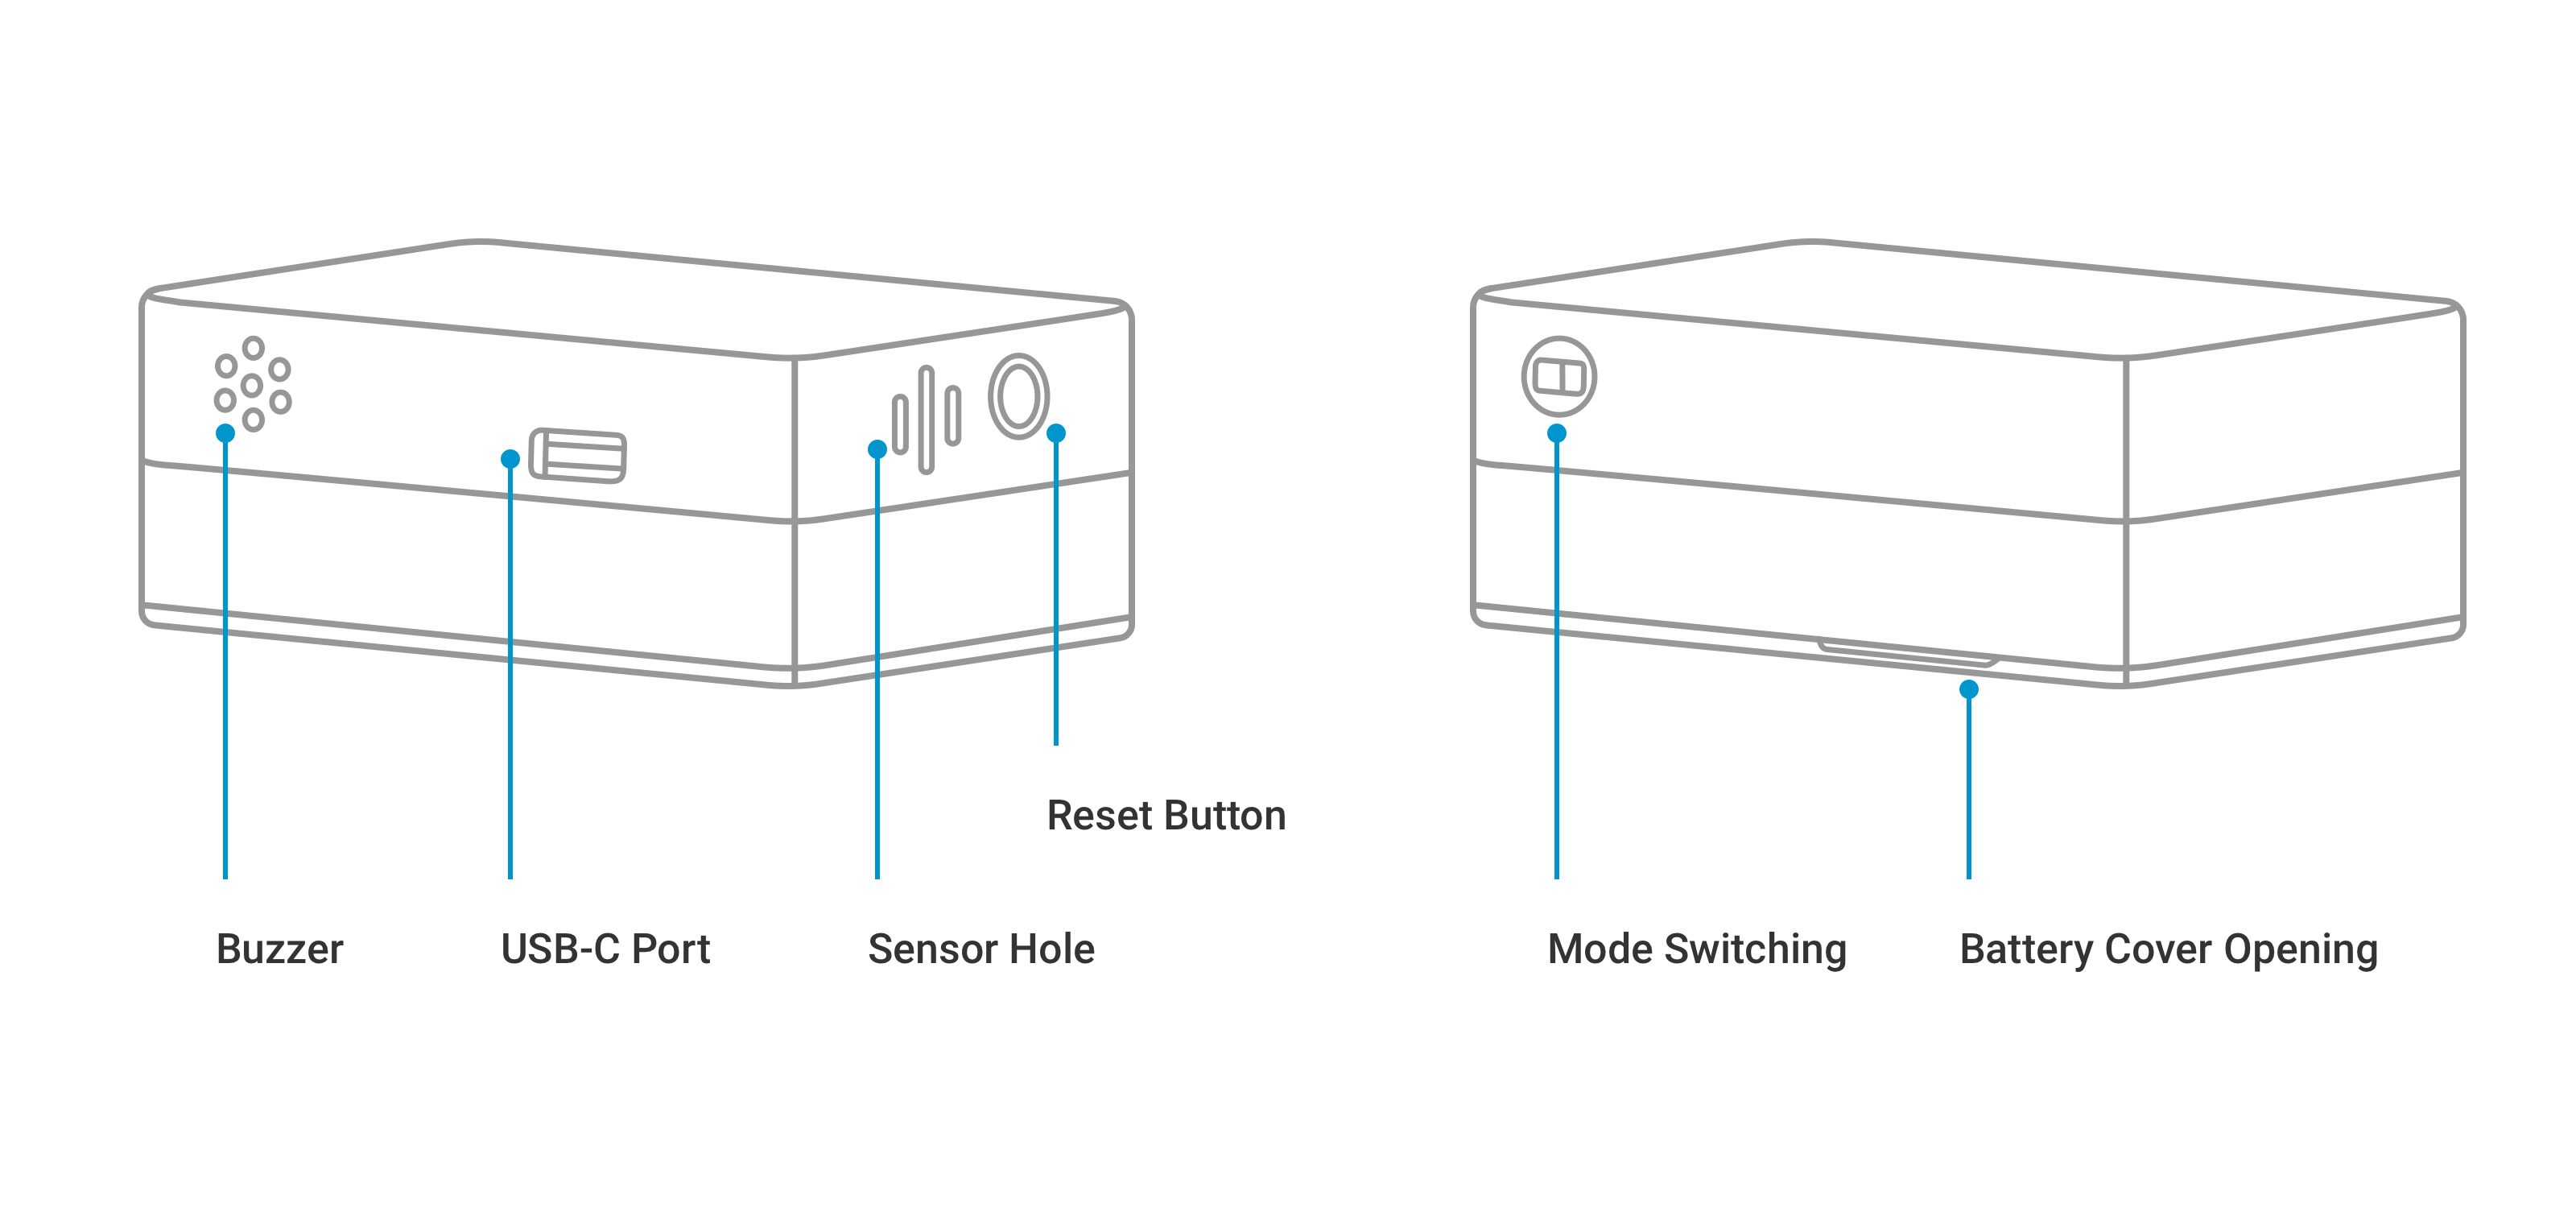
Gravio Multi Sensor transmits various sensor data to Gravio inreal time, including acceleration, gyroscope, and human presence status.

Supported Sensor List: Inertial sensors, human radar sensors, buzzer

Operating Modes: Normal mode and low-power mode.

Mode Switching: Switch via DIP switch. Normal mode supports USB-C power supply with allsensors available; low-power mode supports USB-C or battery power supply with only inertial sensors available, reporting interval of 15 seconds.

Note: This product is for indoor use only.

Quick Setup

  1. After connecting the Gravio receiver to your computer, start Gravio HubKit. If you are using Gravio Hub, you do not need to connect the Gravio receiver. Additionally, if Gravio HubKit is already running before connecting the Gravio receiver, please restart Gravio HubKit after connecting the receiver.
  2. Start Gravio Studio and open the corresponding Gravio Hub. (Double-click to open for Windows and macOS versions)
  3. Enter the device settings interface and confirm that "Zigbee" dongle is displayed in the serial device list and select it.
  4. If this is the first sensor to be connected, press the "Reset button" to reset. (This step is not required for the second and subsequent sensors)
  5. This sensor can be powered by USB-C or battery, switch operating modes via DIP switch, pairing and network joining must be in normal mode.
  6. Prepare for pairing and network joining. The sensor will automatically search and attempt to join the network when first powered on, with a maximum wait time of 120 seconds. If unsuccessful, the device will stop searching. To rejoin the network, long-press the sensor button for 6 seconds. After the blue LED flashes with buzzer beeps, the device begins searching for the network. Green LED stays on when successfully joined.
  7. Click "Start Pairing" to begin pairing the Gravio receiver with this sensor.
  8. Perform "Reset" on the sensor. Please refer to the above image for reset method. If "Gavio-MultiSensor" is displayed in "Connected Sensors", pairing is successful, close the panel. If pairing fails, repeat steps 6-7.
  9. In the device settings interface, create areas (Area) and layers (Layer), in the layer selection list
    For inertial sensors: Please select "Gavio-MultiSensor-IMU"
    For human radar sensors: Please select "Gavio-MultiSensor-Occupancy"
  10. Select the created layer, click the "+" button in the device to associate this sensor with the layer.
  11. In "Binding Devices",
    For inertial sensors: Select "Gavio-MultiSensor-IMU"
    For human radar sensors: Select "Gavio-MultiSensor-Occupancy"
    Click the "Set button", then close the panel.
  12. The layer devices will display respectively
    For inertial sensors: "Gavio-MultiSensor-IMU"
    For human radar sensors: "Gavio-MultiSensor-Occupancy"
    Turn on the switch to start receiving data from this sensor.
  13. The received data can be confirmed in the data viewer.

Note: If connection fails, please move the accessory closer to the Gravio receiver and retry.

Installation

Option 1: Use inertial sensors, place them at the desired location.

Option 2: Use inertial sensors, peel off the protective film and stick them to the desired location.

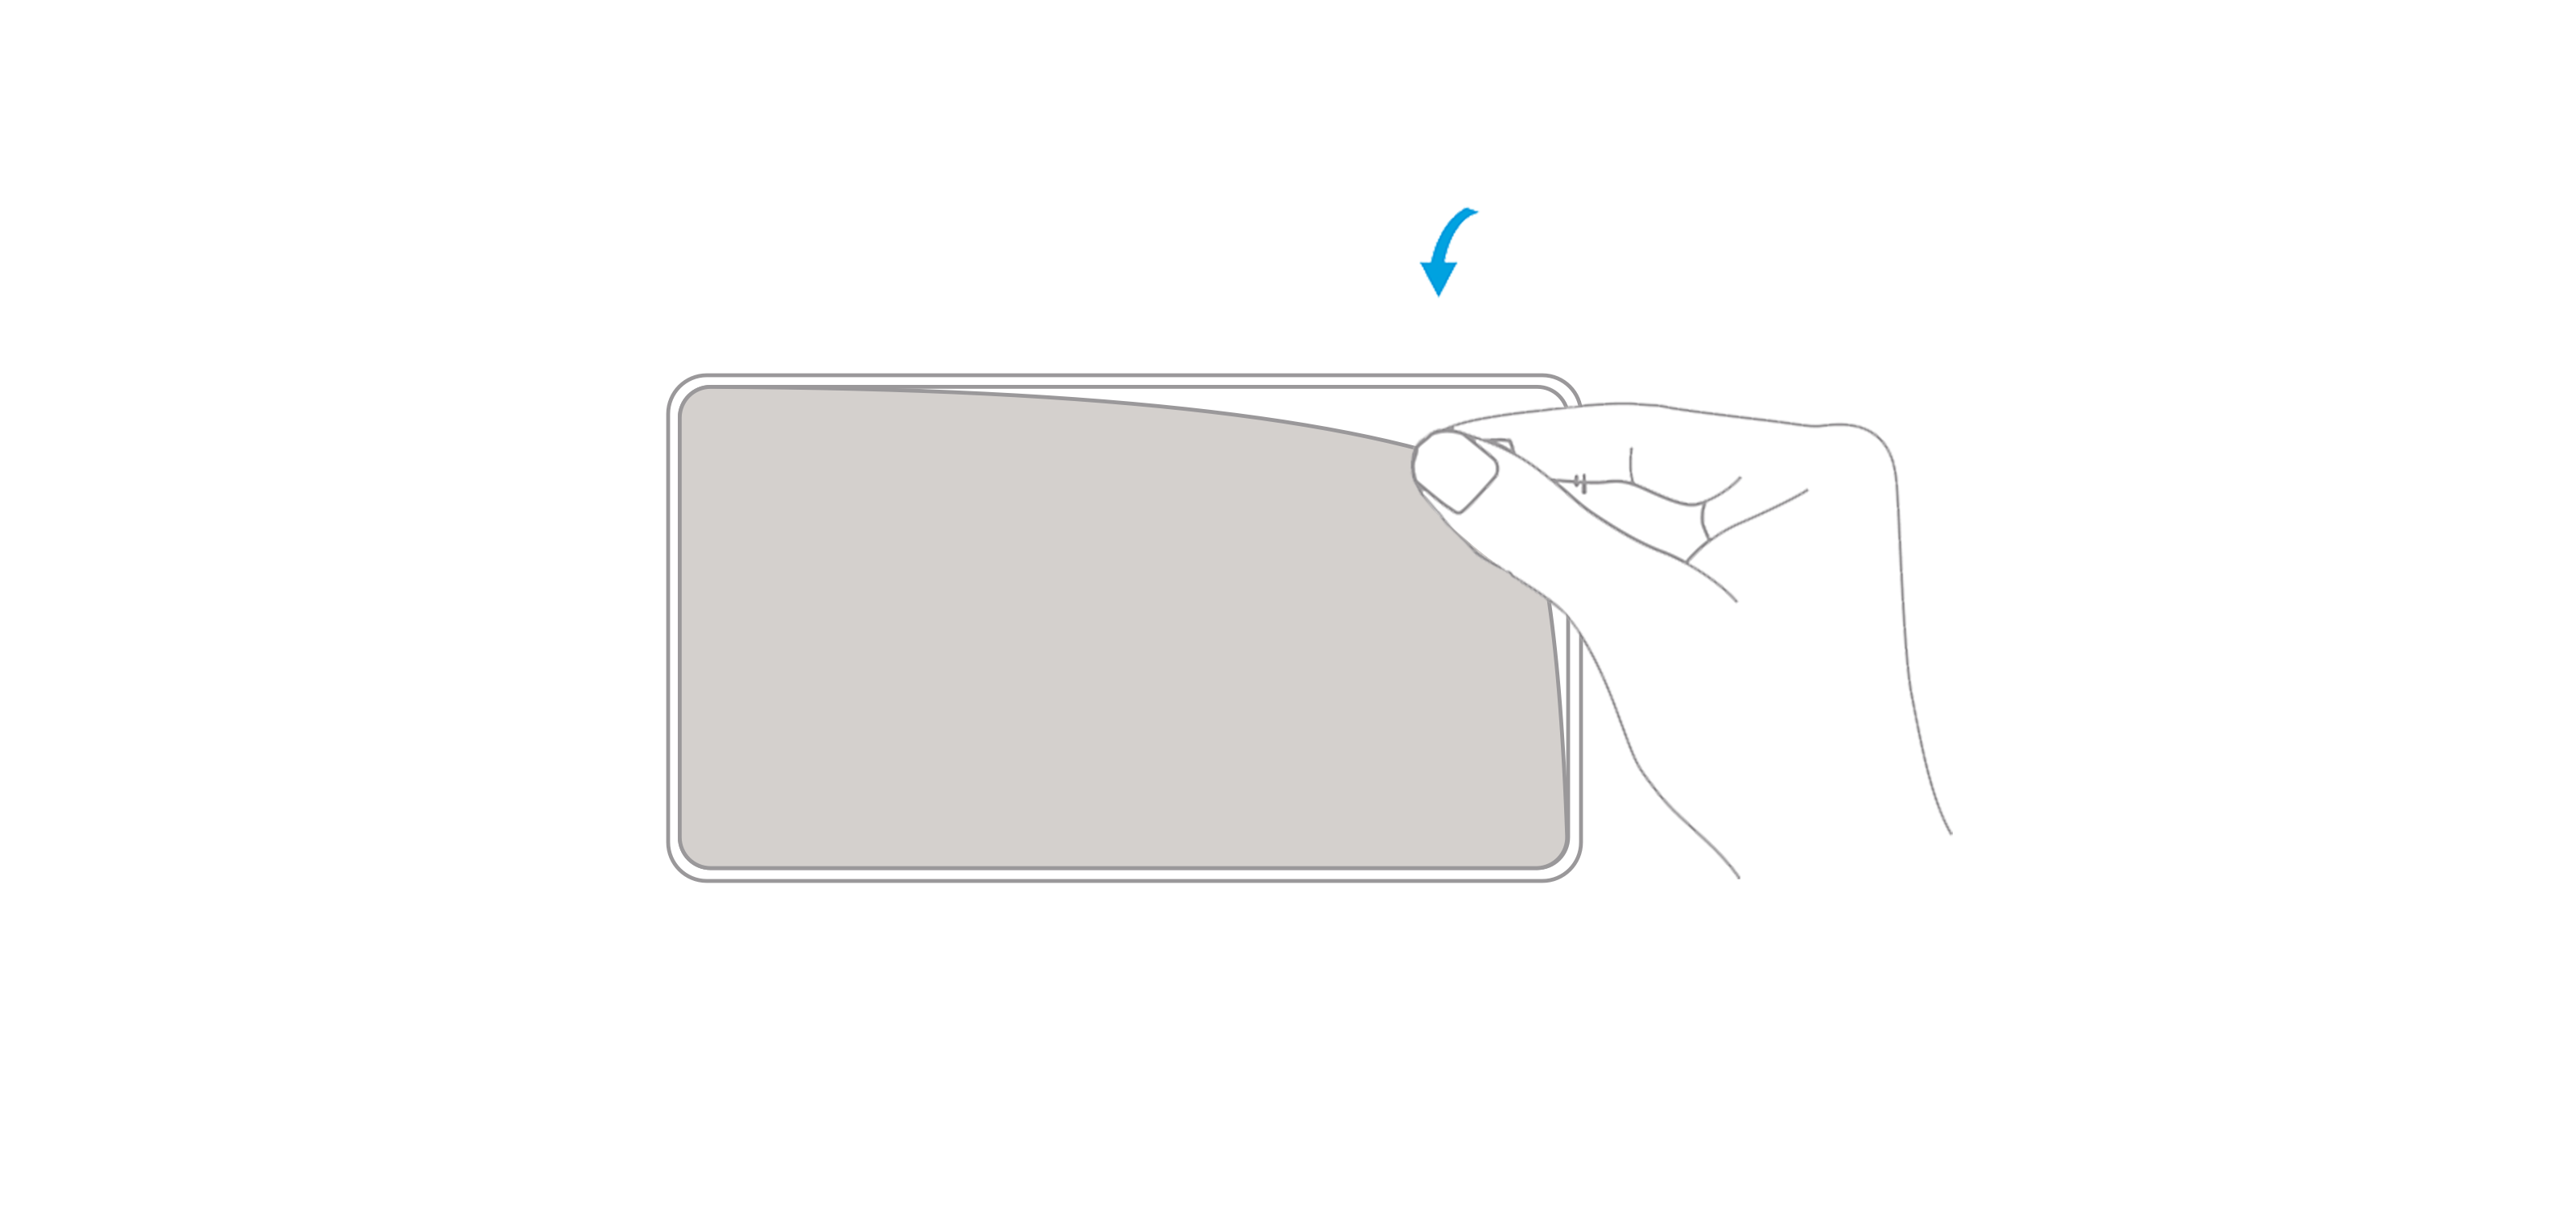
Option 3 : Use human radar sensors, peel off the protective film and stick them to the desired location. There are two installation methods:

Ceiling mounting, installation height: 2.7~3m, detection range: 360°(0°~360°), maximum detectionradius 5m

Wall mounting, installation height: 1.5~2m, detection range: 120°(-60°~60°), maximum detectiondistance 10m

Note: Keep the surface clean and dry.

When installing the sensor, please pay attention to the following points to ensure detection performance and operational stability:

  1. Avoid strong reflective surfaces
    Do not place the sensor directly facing strong reflectors such as air conditioner outlets, mirrors, or metal surfaces, as this may cause false detection. It is also recommended to avoid installing the sensor flush against large metal walls or glass windows.
  2. Avoid airflow influence
    Airflow from air conditioners or fans may move curtains or other objects, resulting in unstable detection. Please avoid positioning the sensor directly in the path of airflow.
  3. Avoid obstructions
    Large furniture or partitions in front of the sensor can reduce detection accuracy. Some non-metallic materials (e.g., wood panels, drywall) may also weaken the detection range. Please adjust the installation position as needed.
  4. Sensitive to subtle movements
    The radar sensor may respond to small movements such as finger gestures, breathing, or the sway of curtains. Movements of pets or large indoor plants caused by airflow may also be detected.
  5. Recommended installation height
    To cover the entire room, it is recommended to install the sensor at a height of 2–2.5 meters (ceiling mount). For wall-mounted installations, a height of 1.2–1.5 meters above the floor is recommended.
  6. Maintain sufficient spacing
    When installing multiple radar sensors, please keep a distance of at least 0.5 meters between them. If space allows, a spacing of 1 meter or more is recommended to further reduce interference.
  7. Avoid direct facing between sensors
    Do not place two radar sensors directly facing each other, as this may cause mutual interference.
  8. Power supply and environment requirements
    Avoid placing the sensor near strong electromagnetic interference sources such as routers, high-power motors, or high-frequency power supplies. Do not install the sensor in humid environments, areas with heavy oil smoke, or locations subject to strong vibration.
  9. Detection range notice
    The actual detection range of the sensor will vary depending on the installation height, angle, and room layout. Please adjust the installation position according to the site conditions.

Specifications

  1. Model: GMS9218
  2. Dimensions: 65 × 40 × 24 mm
  3. Wireless Protocol: Zigbee
  4. Battery: CR2450
  5. Inertial sensor acceleration range and accuracy: ±2g / ±4g / ±8g / ±16g, ±0.04g
  6. Inertial sensor gyroscope range and accuracy:±125 / ±245 / ±500 / ±1000 / ±2000dps, ±10dps
  7. Human radar sensor range:Detection distance 0.7~10m
  8. Operating Temperature: 0~85°C
  9. Operating Humidity: 0~95%RH, no condensation